


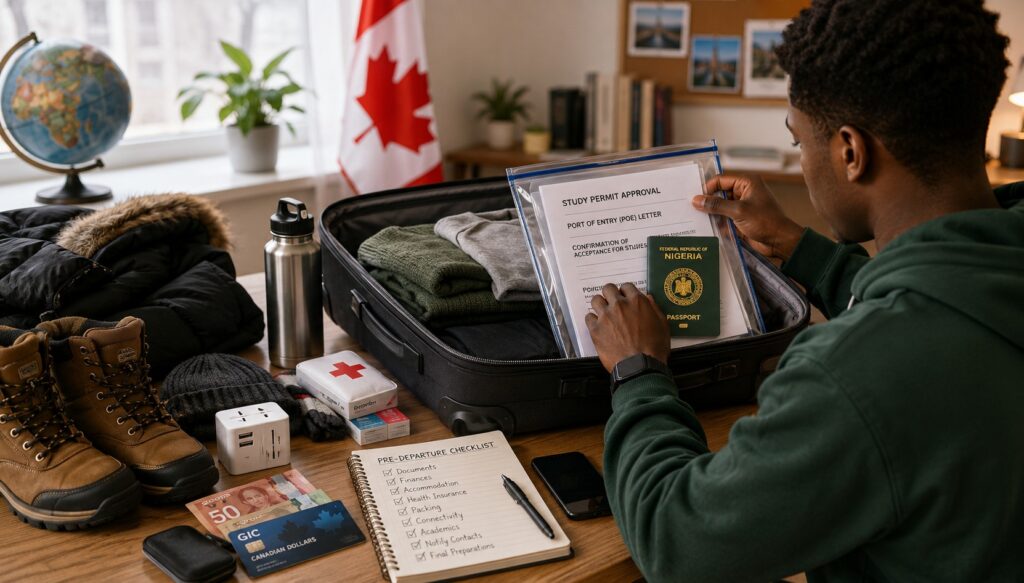
Packing your bags is the easy part. The real journey to studying in Canada begins long before you board that flight, with paperwork, planning, and a dozen small details that can make or break your travel day. Every year, thousands of Nigerian students head to Canada chasing world-class education, yet many arrive flustered, missing documents, or unprepared for Canadian winters. This guide walks you through everything you need to sort out before departure, so you can step off the plane confident, organised, and ready to begin your new chapter abroad.
1. Secure Your Core Travel Documents
Before anything else, gather and verify your essential documents. These include your valid international passport (with at least six months’ validity remaining), your Canadian study permit approval letter, your Port of Entry (POE) letter, and your Confirmation of Acceptance for Studies (or admission letter) from your Canadian institution. Keep both physical copies and digital scans saved on your phone, email, and cloud storage such as Google Drive. Misplacing even one of these can delay or derail your travel plans entirely.
It is also wise to carry your Provincial Attestation Letter (PAL), if applicable, your medical examination certificate, and your biometrics confirmation. Place all documents in a clear folder in your carry-on luggage, never in checked baggage, since you will need quick access to them at immigration.
2. Confirm Your Flight and Travel Itinerary
Book your flight well in advance to secure better fares and your preferred travel dates. Confirm your departure city, layover details, and arrival airport in Canada. Many students travel through Lagos or Abuja before connecting through hubs like Amsterdam, Doha, or London. Double-check baggage allowances, as international students often carry more luggage than the standard limit permits. Most airlines allow two checked bags for international student fares, but always verify with your specific carrier to avoid unexpected fees at the airport.
3. Sort Out Your Finances
Financial preparation is one of the most critical steps. You will need proof of funds, typically a Guaranteed Investment Certificate (GIC) from an approved Canadian bank, which demonstrates you can support yourself during your first year. Ensure your GIC account is active and that you have the confirmation letter and bank reference number ready for presentation at immigration if requested.
Beyond the GIC, carry a reasonable amount of cash in Canadian dollars for immediate expenses such as transportation, food, and incidentals upon arrival. It is advisable to also set up an international debit or prepaid card before leaving, since opening a Canadian bank account typically takes a few days after arrival. Inform your Nigerian bank of your travel plans to prevent your cards from being flagged or blocked while abroad.
4. Arrange Accommodation Before Arrival
Never leave Nigeria without confirmed accommodation for at least your first two to four weeks in Canada. Whether you have secured on-campus housing, a homestay, or a short-term rental, have the address, contact person, and booking confirmation printed and saved digitally. This address will also be required when completing your arrival declaration. Research the neighbourhood, nearby transportation options, and estimated commute time to your school so you are not navigating blindly on arrival day.
5. Pack According to Canadian Weather
Many Nigerian students underestimate how drastically different Canadian weather is, particularly during winter months. Depending on your arrival season, pack layered clothing, a windproof and insulated winter coat, thermal wear, waterproof boots, gloves, and a warm hat. If you are arriving in summer or fall, lighter layers with a few warm pieces for cooler evenings will suffice. Avoid overpacking; most items, including winter wear, can be purchased in Canada, but having at least one warm outfit on arrival is essential, especially if you land during colder months.
Do not forget practical items such as a universal power adapter, a small first-aid kit, and any prescribed medications in their original packaging, accompanied by a doctor’s note if required.
6. Health Insurance and Medical Preparedness
Confirm whether your province or institution provides health coverage automatically or whether you need to purchase private international student health insurance before departure. Some provinces, such as Ontario and British Columbia, require students to arrange private coverage for the initial waiting period before public healthcare becomes active. Carry your insurance documents, a record of vaccinations, and any relevant medical history, particularly if you have ongoing health conditions.
7. Communication and Connectivity
Before leaving Nigeria, research Canadian mobile network providers and consider purchasing an eSIM or international roaming package that activates immediately upon arrival. Staying connected from the moment you land allows you to coordinate airport pickup, contact your accommodation host, and reach family back home without delay. Save important contacts, including your school’s international student office, designated learning institution emergency line, and the Nigerian High Commission in Canada, in your phone.
8. Academic and Personal Essentials
Carry printed and digital copies of your academic transcripts, certificates, and any relevant correspondence with your school’s admissions office. Bring a few passport photographs, as you may need them for student identification cards, transit passes, or banking purposes. If you plan to work part-time, familiarise yourself with Canada’s regulations regarding international student employment hours.
9. Notify Relevant Parties of Your Travel
Inform your bank, mobile network provider, and close family members of your travel dates and destination. Share your flight details and accommodation address with a trusted contact in Nigeria and, if possible, with someone in Canada who can assist you upon arrival. This simple step ensures someone is aware of your movements throughout the journey.
10. Final Pre-Departure Checklist
In the days before departure, reconfirm your flight, weigh your luggage, charge all electronic devices, and pack a small bag with essentials such as snacks, a neck pillow, chargers, and your document folder for easy access during the flight.
Leaving Nigeria to study in Canada is a significant milestone, and thorough preparation transforms anxiety into excitement. By following this checklist, you set yourself up for a smooth transition into your new academic and personal life abroad. Safe travels, and best wishes for an outstanding journey ahead.
Fill this FORM to start your study abroad journey.

Other Articles

How to Book Safe Hotels for Solo Travellers
Can You Apply for More Than One Visa at a Time?




No Comment! Be the first one.